|  | | | |  | |  |  | Mini Lathe Bed up grade... |  | |  |  | |
 Posted: Fri Nov 14, 2008 2:09 am Posted: Fri Nov 14, 2008 2:09 am |
 |
|
| yourdaddyjoe |
| Supporting Member |

 |
|
| Joined: 26 May 2008 |
| Posts: 4027 |
| Location: Tatorville, USA |
|
|
|
Well guys... the shop is down for repairs...
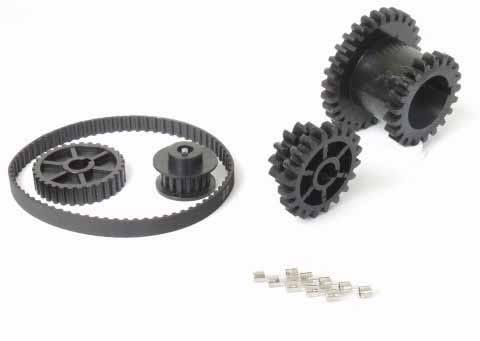
I stripped a few gears on my lathe... I orderd the metal ones from www.littlemachineshop.com and they will be here Monday...
Well it is good as time as any... I bought the exteded bed a few weeks ago and it is time to do the install...


I will do updates as I go... I promise... I will sneek my wife's Digital SLR down to the shop for progress photos... |
|
|
|
|
|
|
| |  |  | | | |  |  |
| | | | | | | | | Longer bed | | | | | |
| Posted: Wed Nov 19, 2008 4:10 am |
|
|
| Amigo |
| Veteran Member |

|
|
| Joined: 18 Sep 2008 |
| Posts: 263 |
| Location: U.S. MidWest |
|
|
|
Joe:
A buddy was over to the shop yesterday and mentioned the inconvenience of the HF 7 x 10 bed. I mentioned to him about your posting about getting an extended bed for your HF 7" - ever see a chubby 65 year old trying to do backflips with joy? Yup, a sight you don't want to see.
I told him if he would quit trying to commit suicide, I would try to get all the details and particulars for him so he can get one just like yours.
BTW, is that new bed 6" longer? And, could you, would you, please post all the afore alluded to particulars so my buddy can get the long bed like yours?
Gracious 
Best regards,
Amigo |
|
|
|
|
|
|
| | | | | | | | |
| | | | | | | | | | | | | | |
| Posted: Wed Nov 19, 2008 11:33 am |
|
|
| yourdaddyjoe |
| Supporting Member |
|
|
| Joined: 26 May 2008 |
| Posts: 4027 |
| Location: Tatorville, USA |
|
|
|
Sorry Amigo,
I have had another delay on the install... My wife's sister who came out from Texas to help her out after her surgerys has only caused more drama in the Mac household... I have had only 1 day in the shop since last week, thanks to her...
Little venting, if you can't tell... I hope you don't mind...
So... just for you buddy... here is the link for the instructions... Most likely written better than I can...
Only Salvia could write them better than the original author...
I personaly could use more pictures...
http://www.littlemachineshop.com/Instructions/BedExtensionKit14.pdf |
|
|
|
|
|
|
| | | | | | | | |
| | | | | | | | | | | | | | |
| Posted: Wed Nov 19, 2008 12:35 pm |
|
|
| yourdaddyjoe |
| Supporting Member |
|
|
| Joined: 26 May 2008 |
| Posts: 4027 |
| Location: Tatorville, USA |
|
|
|
|
|
|
|
|
|
| | | | | | | | |
| | | | | | | | | Longer Bed Info | | | | | |
| Posted: Wed Nov 19, 2008 2:14 pm |
|
|
| Amigo |
| Veteran Member |
|
|
| Joined: 18 Sep 2008 |
| Posts: 263 |
| Location: U.S. MidWest |
|
|
|
Joe:
Thanks for taking the time. I found both links and bookmarked them special.
That bed and your info is exactly what my buddy needs He'll get it ASAP.
PS, I can understand the household frustrations. Sometimes people who want to help have all the best intentions but...nuf said.
With your hectic situation, I appreciate your efforts. Also, I am hoping the best for your wife who has endured so much.
Don't hesitate to ask, if I can help you in the shop.
Best regards to you and your family, and thanks again.
Amigo |
|
|
|
|
|
|
| | | | | | | | |
| | | | | | | | | | | | | | |
| Posted: Tue Dec 16, 2008 10:09 pm |
|
|
| yourdaddyjoe |
| Supporting Member |
|
|
| Joined: 26 May 2008 |
| Posts: 4027 |
| Location: Tatorville, USA |
|
|
|
Well... ooops I did it again... This time I blew a belt...
So... while I wait for parts... Time to install the bed... Photos forth coming... |
|
|
|
|
|
|
| | | | | | | | |
| | | | | | | | | | | | | | |
| Posted: Wed Dec 17, 2008 12:46 am |
|
|
| Jaxom |
| Senior Member |

|
|
| Joined: 06 Aug 2008 |
| Posts: 927 |
|
|
|
|
Since I'm somewhat interested in buying a lathe myself. What do ya do if the stock you're working is longer then the bed?
Example. I want to swap barrles and that'll require some tooling on a lathe. One won't be too much a problem because I'm gonna cut the "stock" size down to 14-18". But for the second rifle I wanna use the whole barrel which is 23.5" long I believe.
Sidebar: What's your opinion on 3 in 1 machine tools? That would save me a bit of money by having an all in one unit. Space as well. |
|
_________________
.22 2300kt Crosman Custom |
|
|
|
|
|
| | | | | | | | |
| | | | | | | | | | | | | | |
| Posted: Wed Dec 17, 2008 1:12 am |
|
|
| kanyon |
| Silver Status Member |

|
|
| Joined: 09 Aug 2008 |
| Posts: 1582 |
| Location: New Zealand |
|
|
|
Joe... You have to order a belt ??
surely its just a "A section vee belt"
not a gilmer or track.
I would just wonder down the road
and return 15 mins later with a new one
from a auto shop/indust surply shop etc |
|
_________________
Career Infinity PCP .22
Webley Patriot .25
Hatsan mod 75 .22
Hatsan mod 99 .177 (Quattro & SAS)
Kral underlever .177
.............................................
. |
|
|
|
|
|
| | | | | | | | |
| | | | | | | | | | | | | | |
| Posted: Wed Dec 17, 2008 2:35 am |
|
|
| ustilago |
| Member |

 |
|
| Joined: 07 Dec 2008 |
| Posts: 24 |
| Location: Coldhell, AB |
|
|
|
| Its a metric sized cogged belt. . .150mm x 10mm I think (I should know, I was just in mine last week upgrading to tapered roller bearings). . . |
|
_________________
Are you Shpongled? |
|
|
|
|
|
| | | | | | | | |
| | | | | | | | | | | | | | |
| Posted: Wed Dec 17, 2008 9:16 am |
|
|
| yourdaddyjoe |
| Supporting Member |
|
|
| Joined: 26 May 2008 |
| Posts: 4027 |
| Location: Tatorville, USA |
|
|
|
| Jaxom wrote: |
Since I'm somewhat interested in buying a lathe myself. What do ya do if the stock you're working is longer then the bed?
Example. I want to swap barrles and that'll require some tooling on a lathe. One won't be too much a problem because I'm gonna cut the "stock" size down to 14-18". But for the second rifle I wanna use the whole barrel which is 23.5" long I believe.
Sidebar: What's your opinion on 3 in 1 machine tools? That would save me a bit of money by having an all in one unit. Space as well. |
Morning Jax,
If the stock is 5/8" or smaller... You can insert it through the chuck and spindle...
3 in 1's don't bother... un-less they have auto feed or else you can not do threads... |
|
|
|
|
|
|
| | | | | | | | |
| | | | | | | | | | | | | | |
| Posted: Wed Dec 17, 2008 9:20 am |
|
|
| yourdaddyjoe |
| Supporting Member |
|
|
| Joined: 26 May 2008 |
| Posts: 4027 |
| Location: Tatorville, USA |
|
|
|
|
|
|
|
|
|
| | | | | | | | |
| | | | | | | | | | | | | | |
| Posted: Wed Dec 17, 2008 6:12 pm |
|
|
| Jaxom |
| Senior Member |
|
|
| Joined: 06 Aug 2008 |
| Posts: 927 |
|
|
|
|
Walther barrles come in 4 different sizes. All are choked and 23.8" long. The external sizes are... .394", .472", .591", and .630".
For the "sniper" rifle I'd like to go with the thickest. For the "long pistol", what would you recommend?
Thanks
Jax |
|
_________________
.22 2300kt Crosman Custom |
|
|
|
|
|
| | | | | | | | |
| | | | | | | | | | | | | | |
| Posted: Thu Dec 18, 2008 12:58 am |
|
|
| kanyon |
| Silver Status Member |
|
|
| Joined: 09 Aug 2008 |
| Posts: 1582 |
| Location: New Zealand |
|
|
|
O OK Its a baby Gilmer belt "Cog belt" |
|
|
|
|
|
|
| | | | | | | | |
| | | | | | | | | | | | | | |
| Posted: Sun Dec 21, 2008 5:43 pm |
|
|
| yourdaddyjoe |
| Supporting Member |
|
|
| Joined: 26 May 2008 |
| Posts: 4027 |
| Location: Tatorville, USA |
|
|
|
So here we go finally...
With the shop down for repairs... No more delays... It is time to do the extended Bed way...
Disassemble per the instructions...
Since you have to remove the head stock to do this upgrade... Buy the kit mentioned above... You will not regret it...
Is soon as I pulled the head stock... White powder went all over... and it was not snow...


The instructions so far... are very well written... So I will spare you my version as I go... I however will make little suggestions that might help.
Right out of the box you will have to drill and tap 4 holes for the Rack...
Just follow the instructions and go slow...
Make sure you use your favorite cutting oil... It's cast steel...


Tada!

I got these great little tubes from my buddy over at Auburn Tool to keep the taps and matching drills together. I labeled them with the tap size and required drill. I use a regular old pencil box to store them in... I have a bag of desiccant in there to keep the moisture down... (My Wife calls them Chicklets. Thanks Bill Engval...)

Next comes the feed screw thing-a-ma-bob...
Again... Follow the instructions to a T... The measurement is from the edge of the right head stock hole... Not the center... It is mentioned... but you all know us guys with instructions...
One little Tip for this section...
A 3" C-clamp will not hold the left pillow block... The casting on the back side is sloped... Vise Grips work better and are skinny enough to land on a flat spot in the back...

The right side is good with the C-Clamp...

Lunch Time! Then back to work... |
|
|
|
|
|
|
| | | | | | | | |
| | | | | | | | | | | | | | |
| Posted: Mon Dec 22, 2008 7:53 pm |
|
|
| yourdaddyjoe |
| Supporting Member |
|
|
| Joined: 26 May 2008 |
| Posts: 4027 |
| Location: Tatorville, USA |
|
|
|
| Yes! The rest of the parts are here! Updates soon... |
|
|
|
|
|
|
| | | | | | | | |
Note: If you are seeing "Please enter your username and password to log in." Your browser cookies have been reset
or you need to register to access the topic in question. Use the 'Register' button near the top left of this page.
|