|  | | | |  | |  |  | Custom Disco/22xx Hunter Carbine (Pic Heavy!) |  | |  |  | |
 Posted: Wed Dec 18, 2013 6:46 am |
 |
|
| Sholo |
| Veteran Member |

 |
|
| Joined: 24 Mar 2011 |
| Posts: 125 |
| Location: Eastern Ontario |
|
|
|
WARNING! - This is a LOOOONG post, so take your bathroom break now, grab a snack and either a beer or coffee (depending what time of day it is where you are) and settle in! 
This is going to be somewhat of a "bass-ackwards" type of build as I will be starting off with the stock mods first, then do the running gear later as I get them done. Also, I feel I should warn you that this will be a rather long, drawn-out build as I still need some custom parts done and my machinist buddy works away from home for months at a time. He is however off for the winter starting late Dec, so as soon as the Xmas season is out of the way we will be hooking up to finish my build. I can hardly wait!
First, a little background on the build...
I've been wanting to build a somewhat compact, "bush-proof", small game hunting PCP for some time now that was tailored to my specific needs/wants and this is what I came up with. Except for a few pieces that need to be done on a lathe/milling machine by a skilled machinist (which I am not  ), most stuff was done with "caveman" tools and lots of elbow grease!
Parts include:
Shortened Disco tube (4" shorter than stock)
Disco valve (modified), fill adapter & cover, hammer spring and modified hammer
Extended valve front from Joe @ HPASports
M-rod pressure gauge
20" LW barrel (.22 cal) threaded 1/2"-20 NF to accept Hatsan air stripper
Hatsan air stripper
7/8" OD Carbon fiber shroud
P-rod trigger group
Custom repeating breech and bolt
Custom Crosman shoulder stock
Custom forearm
CenterPoint 4-16x44mm SF scope w/side wheel
Now that we have the preliminary babbling out of the way, let's start the build!
As I stated earlier, I wanted a "bush-proof" gun meaning I needed a stock that not only was custom fitted for my long LOP and large hands, but would also be able to handle trekking through bush, branches, rainy weather and just generally harsh conditions without getting all beat up in the process (or caring too much if it did get some "battle scars"). Hmmmm....I guess a nice walnut stock is out of the question then... I had a couple extra Crosman skeleton stocks and thought, "Perfect, they are pretty tough as well as being light...just need to beef it up some to be more comfortable to shoulder is all". This is where I should point out that I have never tried this before and pretty much figured things out as I went.... .Here is how it was done....
I have an old 2240 grip frame and tube that I use to trial fit things on so I attached stock to it and started the process. First thing I did was to take some 80 grit sandpaper and rough up the stock where I planned on building it up, as well as sanding that Crosman logo off to make it a little more clean looking. I also ground off that little nubby that sticks out on the bottom of a 22xx grip frame as it always felt awkward in my hands (it sticks out right where my pinky finger naturally wants to rest). Then I started adding Bondo to the grip - yes, that's right...Bondo! 
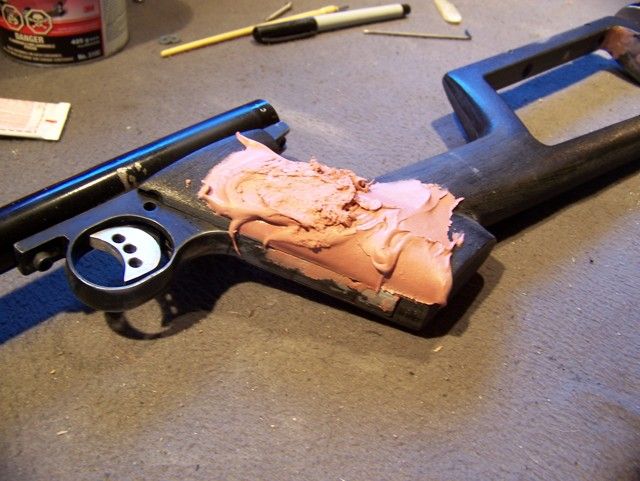
Don't worry...I know it's pretty crude right now, but it gets better looking as we go!
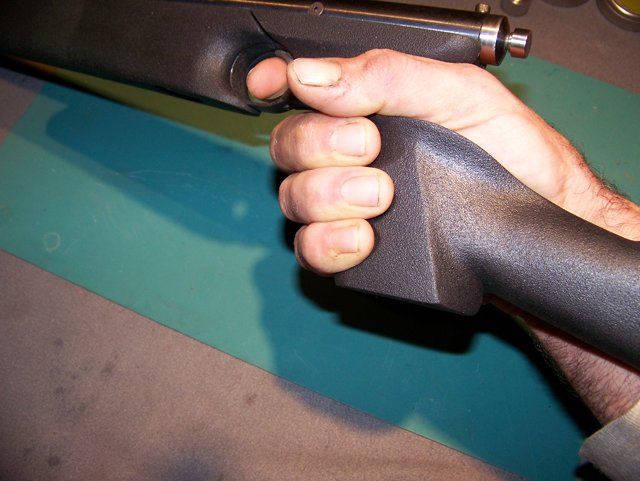
Once I had a thick blob on I gingerly grabbed the grip and gave it a little squeeze so it would mold to the shape of my hand before it hardened. This was a slow process as the Bondo would set rather quickly, so I had to do it in several stages (one side at a time), building it up a bit more each time until I had it roughly to the size/shape I wanted. Then it was mostly sanding and shaping the contours, adding a bit here and there as needed. Note: If you are wondering why the bottom finger groove looks out of whack, it wasn't a screw-up (really, it wasn't!), it's just where my pinky finger naturally wants to rest...
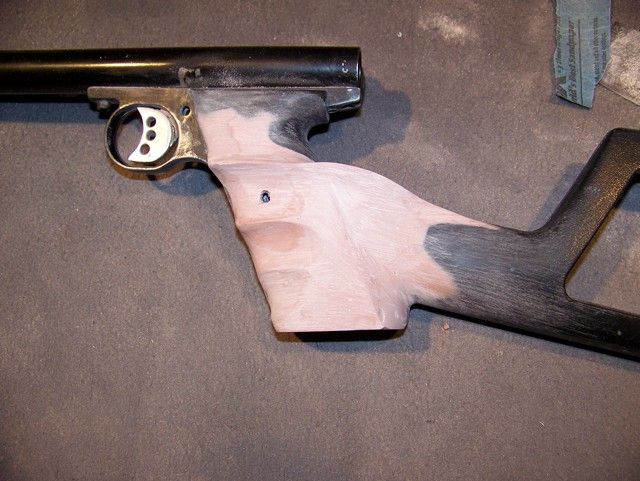
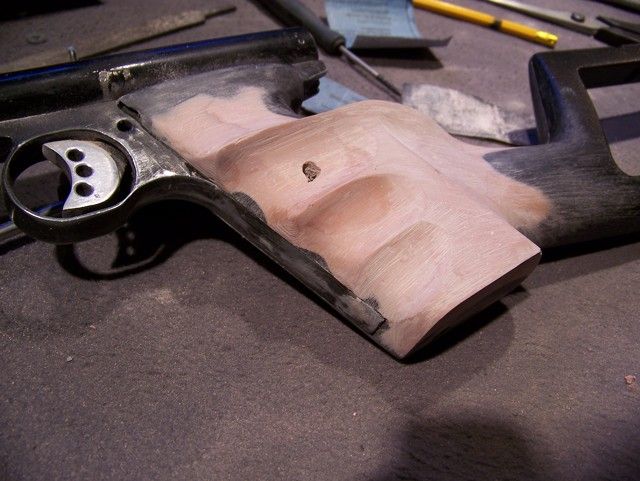
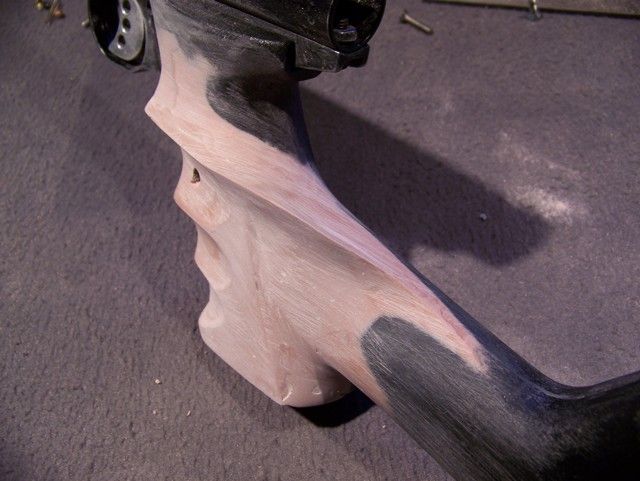
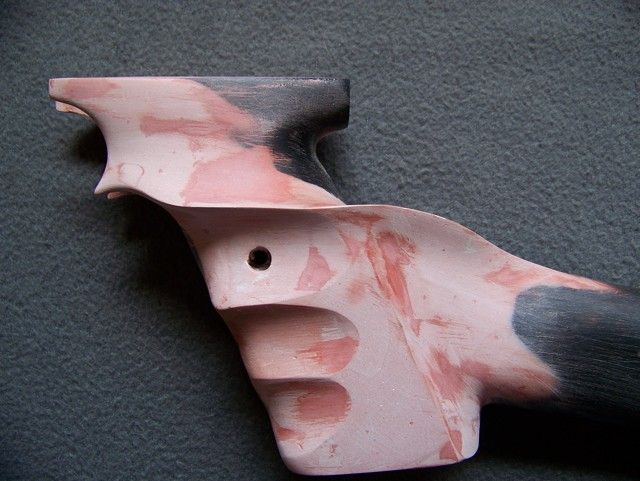
Once I had one side pretty well roughed out, I then started the whole process all over again for the opposite side:
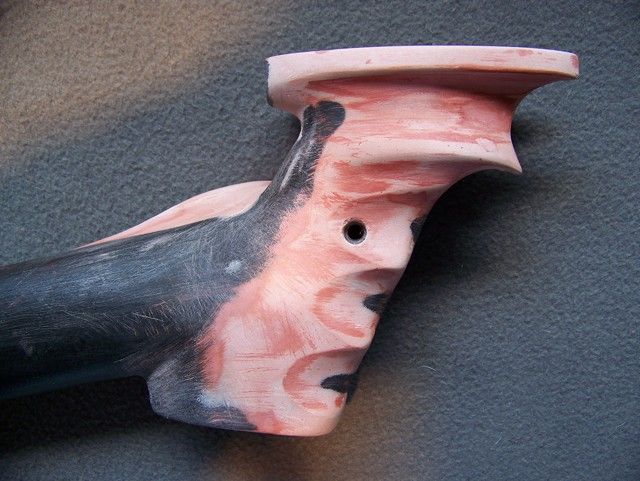
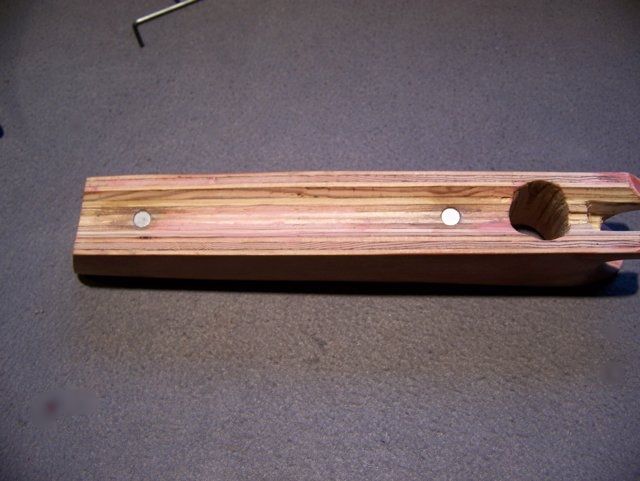
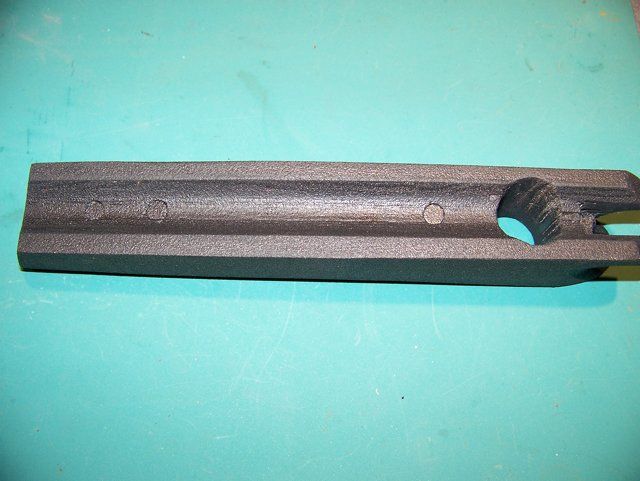
Now that I had the grips mostly done (still have some fine tuning to do to match nicely with the forearm) I turned my attention to the forearm. This was made by laminating two pieces of 3/4" plywood together, then slowly shaped it to fit the gun. Used a router with a 3/4" half-round profile bit to cut the rough groove for the tube, then finished it off with a 12" long, 3/4" diameter wooden dowel wrapped in 60, then 120 and finally 220 grit sandpaper. Next I inletted for the trigger group and guard so that most of the trigger guard was hidden within the forearm. Once I was satisfied with the fit to the best of my limited abilities, I then carefully measured where the gauge would be and drilled it out with a 1" Forstner bit in my drill press. Thankfully (and with great relief) it fit perfectly! I wanted to attach the forearm as cleanly as possible (i.e- no visible band) so I purchased some super strong 5/16" diameter x 1/8" thick Neodymium (rare earth) disc magnets and inletted/glued them into the forearm. Pic shows only two, but I ended up adding a third one just behind the front one as two just wasn't quite enough. Between the magnets and the tight fit around the grip frame/guard (it actually "snaps" into place around the guard) it is very solid and takes a bit of force to remove from gun.
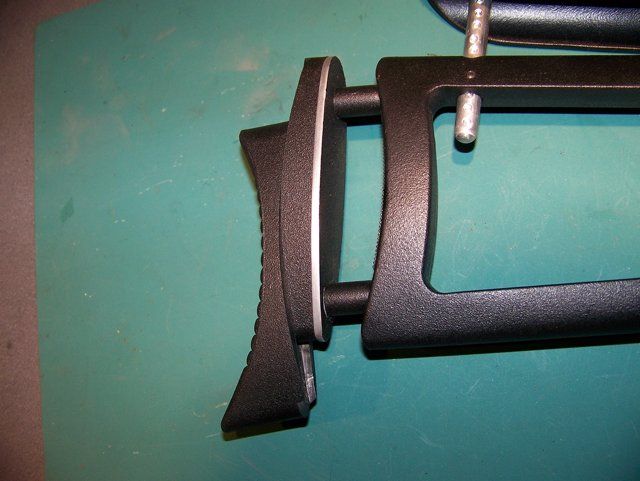
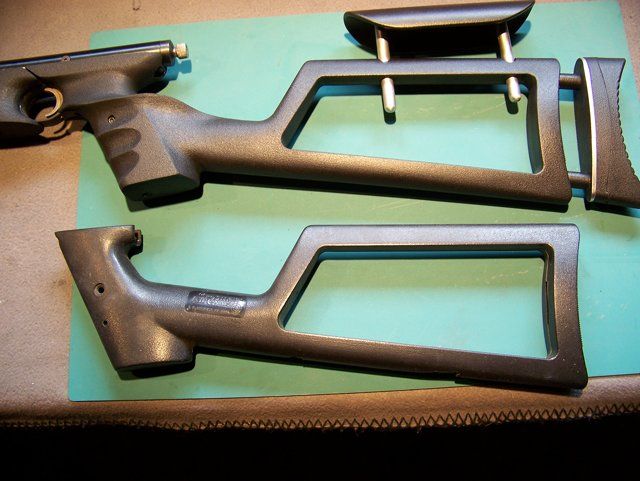
Now that the forearm was done, I finished touching up the shoulder stock so there was a nice transition from stock to forearm. Once that was accomplished I turned my attention to the rear of stock. Started by first adding an adjustable butt plate and lengthen the LOP to accommodate my ape-like arms. The two extension pieces are 1/2" Delrin rod that I threaded 1/2"-20. Then drilled/tapped the rear of stock the same and screwed them into place, filled the inside (cut-out section of stock) with more Bondo and sanded smooth for a clean look. Adjustable butt pad is from an AR2078LE and I made the aluminum backing plate out of some scrap 1/8" thick material I had laying around. It is attached to the extension rods (which are drilled/tapped 10-32) with 10-32 x 1 1/4" long low profile socket head cap screws:
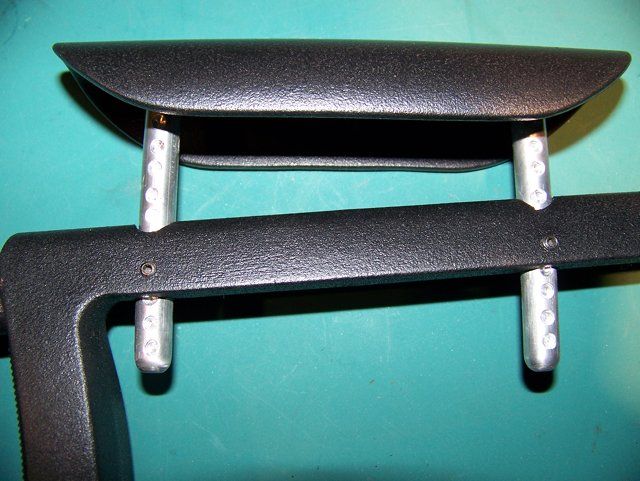
Next up is the adjustable cheek piece. I made it from a 6" long piece of 1.5" ABS pipe cut in half lengthwise and rounded the ends off. The aluminum rods to adjust the height are 3/8" diameter x 3 1/2" long and is attached to the cheek piece via two 8-32 x 1/2" long low profile SHCS down through the top of cheek piece:
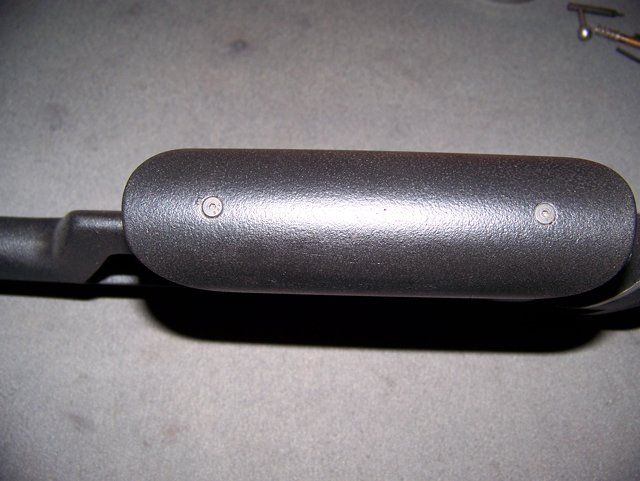
Stock was drilled 3/8" to accept adjustment rods and drilled/tapped the sides of stock 8-32 for the 3/16" long set screws to lock them into place. Rods have 1/8" recesses drilled into them every 1/4" creating a positive lock for the set screws to fit into:
Now that I had the stock to my liking, I "borrowed" an excellent idea from a member on another forum and applied three fairly thick coats of cyan..a..c...??.....Krazy Glue to all Bondo'd parts to seal them and create a hard protective coating, then 4 coats of truck bedliner spray to all components. Much to my surprise, the bedliner spray almost perfectly matches the factory Crosman shoulder stock.
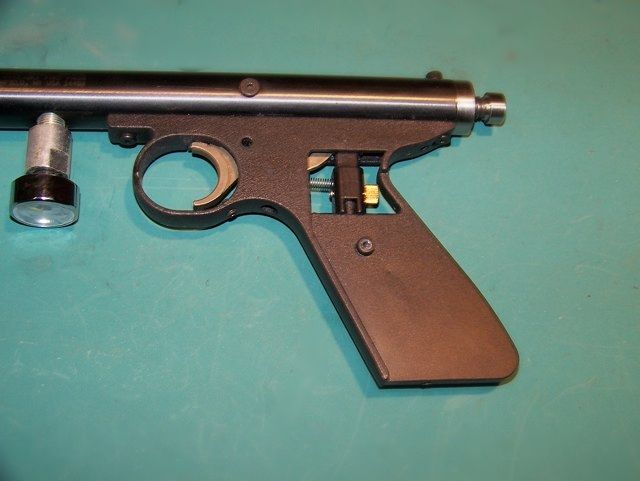
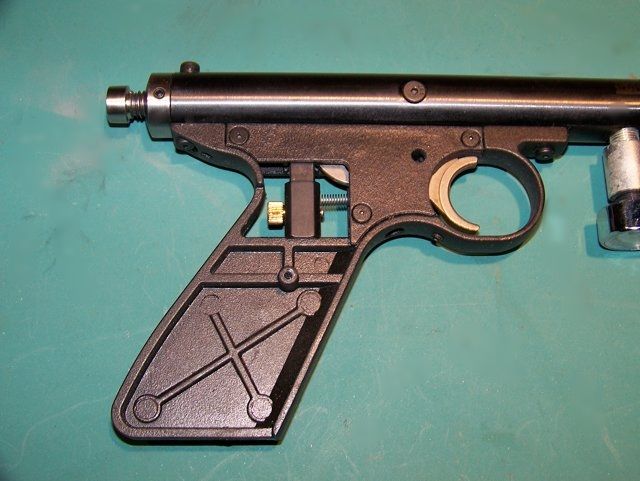
All I had to do now was modify my P-rod trigger group to fit stock. First thing I had to do was smooth out the frame so it would slide nicely into "new" stock. This meant removing the bump-out for the safety (no safety on gun anymore) as well as the little tabs to locate the factory pistol grips. I also removed that aggravating little nub at the bottom of grip as that is right where my pinky finger likes to sit comfortably. One other area that has always bothered me on a 22xx frame is the rear portion (where rear screw is located) as it always rubs on the base of my thumb, so I removed some material giving it a more slanted profile and more room for my thumb Also drilled/tapped the base of frame 6-32 to add a third screw to the stock which now makes it rock-solid. Once that was all done, I gave it a few coats of bedliner spray to match rest of stock:
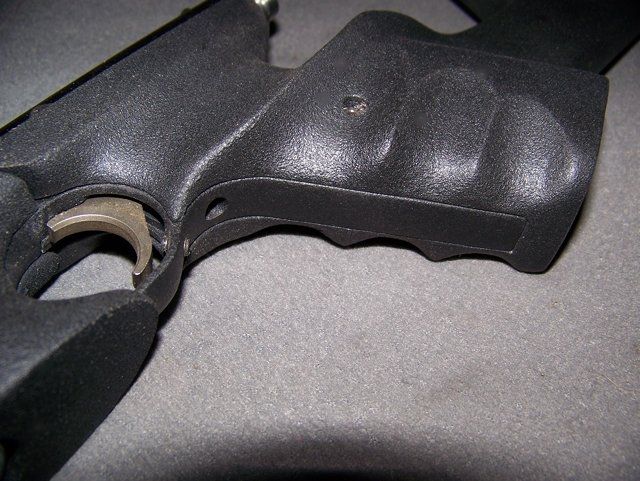
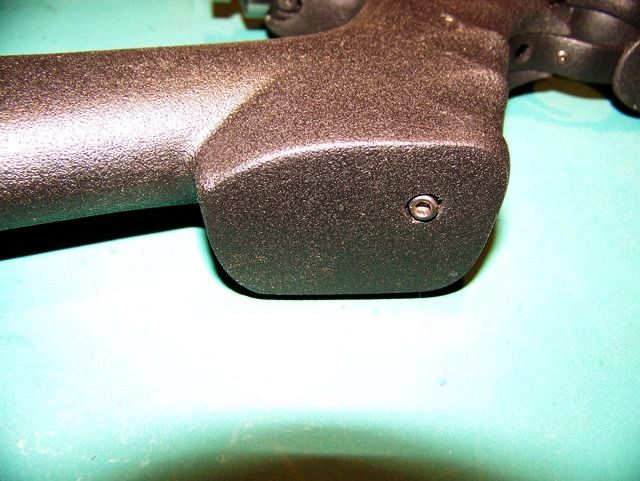
Forearm with three magnets installed:
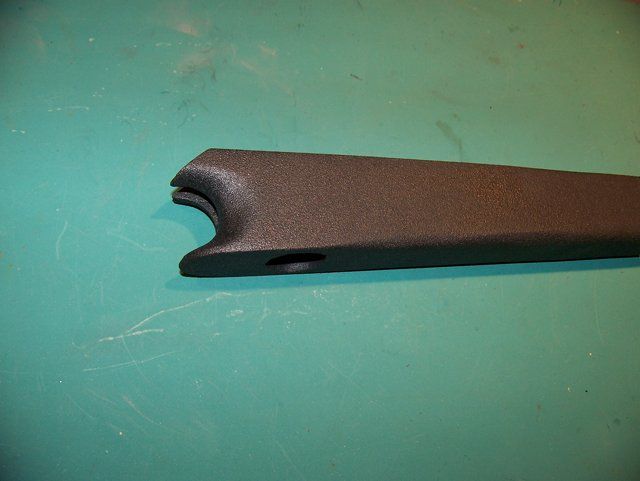
After all that work, a perfect fit! 
And finally, the fruits of my labor...

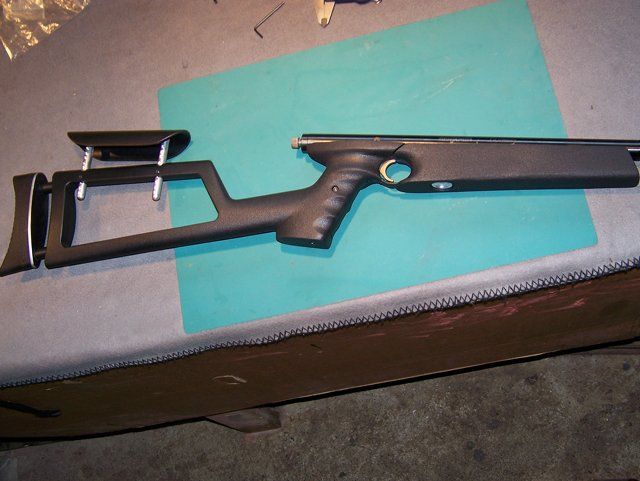
My apologies for the long-winded post guys & gals , (I will make sure my next ones are much shorter!) but I wanted to fit the whole stock transformation into one post....Hope you enjoyed it though, and possibly gave you some ideas to try at the same time!  |
|
_________________
Cheers,
Todd |
|
|
|
|
|
| |  |  | | | |  |  |
| | | | | | | | | | | | | | |
| Posted: Wed Dec 18, 2013 10:45 am |
|
|
| ace |
| Member |

 |
|
| Joined: 08 Jun 2013 |
| Posts: 55 |
|
|
|
|
| brilliant job Todd cant get enough of it the more i look at it the more i like it |
|
|
|
|
|
|
| | | | | | | | |
| | | | | | | | | | | | | | |
| Posted: Sun Dec 22, 2013 2:17 pm |
|
|
| robert w |
| Senior Member |

|
|
| Joined: 12 Feb 2012 |
| Posts: 574 |
| Location: usa |
|
|
|
| might been long but worth every word . you did great . I like it |
|
_________________
,crosman 400,gamo big cat in .22, diana 5g,diana 54 air king, diana 34 in .22 diana 34 in .177, wilrauch hw-55,and a romainian pioner training rifle , and a huge collection of powder burners 35 last count . 1 would think i have a gun store |
|
|
|
|
|
| | | | | | | | |
| | | | | | | | | | | | | | |
| Posted: Wed Dec 25, 2013 7:20 am |
|
|
| ZipSnipe |
| Veteran Member |
|
|
| Joined: 09 Mar 2012 |
| Posts: 327 |
|
|
|
|
| Looks great, I like the custom shaping for your fingers. Ya got a way to put a scope on there? |
|
_________________
You can have tomorrow, I'll take yesterday !!! |
|
|
|
|
|
| | | | | | | | |
| | | | | | | | | | | | | | |
| Posted: Wed Dec 25, 2013 10:01 am |
|
|
| Sholo |
| Veteran Member |
|
|
| Joined: 24 Mar 2011 |
| Posts: 125 |
| Location: Eastern Ontario |
|
|
|
Thanks, guys. I'm hoping once the Christmas madness is over with I can get her finished and start testing...
| Quote: |
| Ya got a way to put a scope on there? |
Yup! Just have to wait until breech, barrel and shroud are mounted. Trying to see if I can get a custom breech made, but if that deal fails to materialize then I will just purchase and modify a BNM one... |
|
_________________
Cheers,
Todd |
|
|
|
|
|
| | | | | | | | |
| | | | | | | | | | | | | | |
| Posted: Wed Dec 25, 2013 6:22 pm |
|
|
| jeffersonian1962 |
| New Member |

|
|
| Joined: 19 Dec 2013 |
| Posts: 3 |
|
|
|
|
| My buddy is looking to sell me his .22 Disco, with tuning mods, and I am thrilled! What kind of muzzle energy do you think you will get from your "Disco", once you have it all together? |
|
|
|
|
|
|
| | | | | | | | |
| | | | | | | | | | | | | | |
| Posted: Thu Dec 26, 2013 9:25 am |
|
|
| Sholo |
| Veteran Member |
|
|
| Joined: 24 Mar 2011 |
| Posts: 125 |
| Location: Eastern Ontario |
|
|
|
This one is going to be tuned for 22-25 fpe...15.9 gr JSB Jumbo's or 16 gr Polymags @ 800-850 fps.
I'm building this gun to take over the tree rat,grouse and rabbit hunting responsibilities that I used to use my 31 fpe 2260 HPA for...2260 is now in the process of being transformed into a 60 fpe .25 cal...  |
|
_________________
Cheers,
Todd |
|
|
|
|
|
| | | | | | | | |
| | | | | | | | | | | | | | |
| Posted: Thu Dec 26, 2013 1:25 pm |
|
|
| Slavia |
| Moderator |

 |
|
| Joined: 31 Mar 2008 |
| Posts: 4382 |
| Location: Waseca, Minnesota, USA |
|
|
|
| Very professional execution, and a good eye for lines. I love it when ordinary materials are transformed into something extraordinary. |
|
_________________
 ¡Listo! ¡Apunte! ¡Fuego! |
|
|
|
|
|
| | | | | | | | |
| | | | | | | | | | | | | | |
| Posted: Fri Dec 27, 2013 8:02 am |
|
|
| Sholo |
| Veteran Member |
|
|
| Joined: 24 Mar 2011 |
| Posts: 125 |
| Location: Eastern Ontario |
|
|
|
Thanks, Slavia! 
Believe me - there is nothing very "professional" about me! Only own a few "caveman" tools and I usually have a hard time drawing a straight line with a ruler for crying out loud ...but I have a lot of fun doing it and that's half the battle right there...
| Quote: |
| I love it when ordinary materials are transformed into something extraordinary. |
Well sir, give yourself a pat on the back for me then will ya, 'cause you are the MASTER at it! The amount of "ordinary" materials I've seen you incorporate into your builds in the few years I've been here is just plain cool . Believe it or not, I get a lot of inspiration from your projects while doing mine, and several times have caught myself saying, "Oh yeah, that should be 'Slavia-approved' "! 
*This concludes our 'kissing a$$' portion of the thread and we now return you to your regularly scheduled programming"!* |
|
_________________
Cheers,
Todd |
|
|
|
|
|
| | | | | | | | |
| | | | | | | | | | | | | | |
| Posted: Fri Dec 27, 2013 11:04 am |
|
|
| Slavia |
| Moderator |
|
|
| Joined: 31 Mar 2008 |
| Posts: 4382 |
| Location: Waseca, Minnesota, USA |
|
|
|
Thanks for going to the trouble to post that whole thing. Sometimes it takes as long to post as it did to do the work, but I (and I believe, you) do it in hopes that someone might find even one little element useful.
Which brings me to your "sliding rod" arrangement for the comb adjustment. I did the same thing with my Mendoza, but without the little "dimples," and it takes a lot of clamping force from the setscrews to keep things in place. I think I will steal that idea.
On a side note - I remember a while back Alstone did something similar. (I don't remember the application, just the mechanism.) Except instead of setscrews he had spring-loaded ball bearings that would allow the rod to snap into place.
Got to get me some Bondo. Your application of super glue has me thinking. I understand the motive - Bondo can be brittle and crumbly, and a hard surface layer is a good idea. I wonder if polyurethane spray would accomplish the same thing - I can just see myself becoming a permanent attachment to the shop bench. |
|
_________________
¡Listo! ¡Apunte! ¡Fuego! |
|
|
|
|
|
| | | | | | | | |
| | | | | | | | | | | | | | |
| Posted: Fri Dec 27, 2013 5:23 pm |
|
|
| Sholo |
| Veteran Member |
|
|
| Joined: 24 Mar 2011 |
| Posts: 125 |
| Location: Eastern Ontario |
|
|
|
| Quote: |
| Sometimes it takes as long to post as it did to do the work, but I (and I believe, you) do it in hopes that someone might find even one little element useful. |
Tell me about it...I know you've never seen me type, but trust me - it's painfully s..l..o..w 
And yes, if even one person can use an idea of mine (rare as they are), or even a form of it, for their own project then my posting was worthwhile IMO. Also, I (like you) don't yet have a lathe or milling machine and even when I do I will never be an Rsterne, Alstone, SMP, Yourdaddyjoe, etc, so when/if I can figure out a way to get the same end result but in a "caveman" sort of way, then surely someone else would find it useful. If nothing else, at least show others just starting out that (as handy as they are) you don't need a lathe/milling machine, just a good imagination and some elbow grease! As long as it's done SAFELY, don't be afraid to experiment
| Quote: |
| Which brings me to your "sliding rod" arrangement for the comb adjustment...I think I will steal that idea. |
See?...I just started the project and already it's proved useful!
| Quote: |
| I wonder if polyurethane spray would accomplish the same thing |
Great idea...wish I would have thought of that! I would think it would work very well, and being a spray it could definitely be applied a lot easier/quicker with a better (smoother) finish. I'll have to remember that for the next one.
Oh, btw, that cool little mechanism of Al's with the spring-loaded ball bearing?....IIRC that was on his power adjuster/RVA from his QB78 (fourth post down)..: http://www.airgunhome.com/agforum/viewtopic.php?t=1586&postdays=0&postorder=asc&start=15 |
|
_________________
Cheers,
Todd |
|
|
|
|
|
| | | | | | | | |
Note: If you are seeing "Please enter your username and password to log in." Your browser cookies have been reset
or you need to register to access the topic in question. Use the 'Register' button near the top left of this page.
|