 |  | | | |  | |  |  | 1750 PCP Target Pistol |  | |  |  | |
 Posted: Sat Mar 23, 2013 11:43 am Posted: Sat Mar 23, 2013 11:43 am |
 |
|
| Sholo |
| Veteran Member |

 |
|
| Joined: 24 Mar 2011 |
| Posts: 125 |
| Location: Eastern Ontario |
|
|
|
Decided to turn the wife's Co2 powered 2250B (now .177 cal) into a 1750 PCP target pistol (she never shoots it anymore, anyways!). I was originally going to get a Hi-Pac but instead picked up a Disco valve, fill adapter and gauge from Eric at ScopesAndAmmo.
I wanted a gauge installed so I knew when to refill BEFORE accuracy went south, so the first hurdle to pass was where to mount the gauge...but where ?. With the 2250 tube being such a small reservoir for air, using a Disco or P-rod gauge block was out of the question - just simply not enough room. I could have just removed the fill nipple, installed a "street T", then re-install nipple (straight out) and gauge (pointing down). This would have been the easiest way, but I wanted something a little cleaner looking - not look like a plumbing job...
So after looking at the fill adapter and gauge for awhile, I came up with this solution:
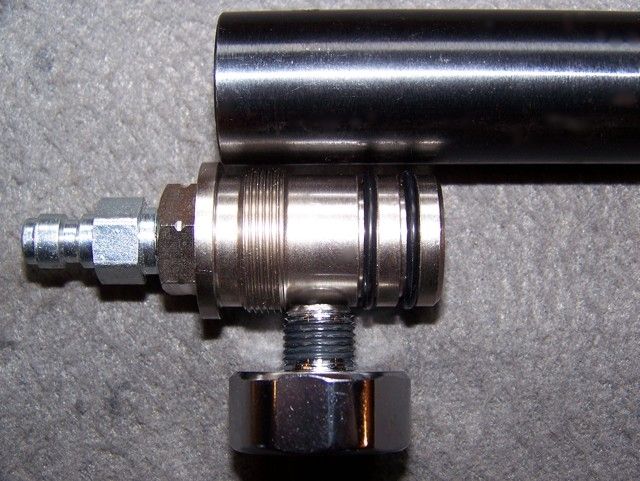
I managed to drill/tap the fill adapter 1/8"NPT without messing up the o-ring grooves OR the threads on adapter. It's a tight fit, but doable... . I'll admit I was unsure as to how much material there was in fitting to ensure enough threads for a safe, leak-proof connection, but as it turns out there was plenty - enough for 5 full threads...
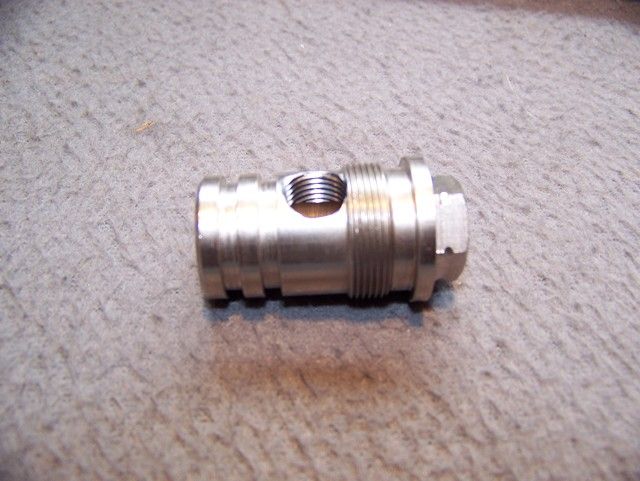
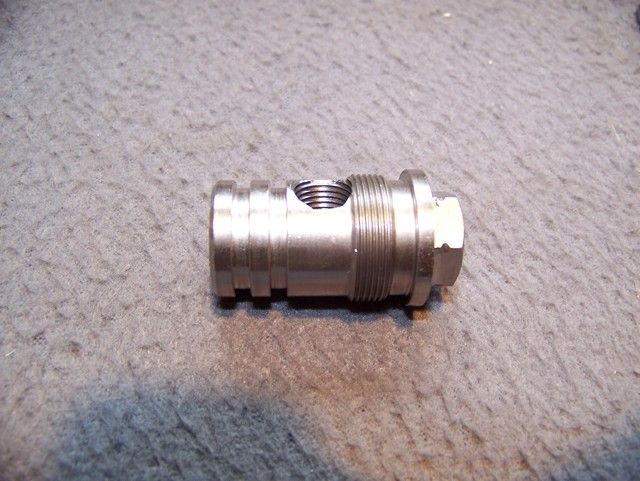
De-burred the rough edges on both adapter and tube, did some touch up bluing on tube once all the shrapnel was cleaned out/washed down, then lubed the o-rings with some silicone grease, put them in there respective places and reassembled gun. Grabbed my Hill pump and pumped it to 2000 psi (a whole 24 strokes! ), checked for leaks (none) and left it to sit overnight. Got up the next morning half expecting the gauge to be on "zero", but lo-and-behold it was good! I did notice however, that when gauge on Hill pump was at 2000 psi, the Disco gauge only read about 1850-1900 psi (+/-).
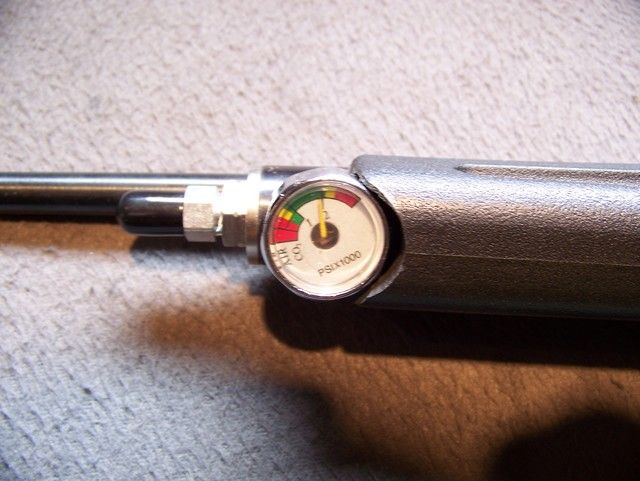
I still have some trimming to do on forearm to even up the gap some and smooth it out, but at least the gauge is staying put:
Weather is pretty crappy here today and as a result I got the day off (Gee, darn! ) so I'm headed to the basement to commence testing and tuning! Will post my results later on today/tomorrow.
Before I go, here is a pic of the gun in its current form:
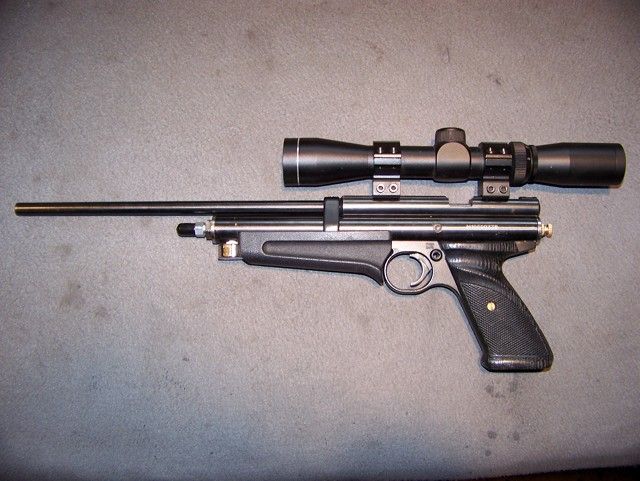
LOL...before everyone asks, "Why did you put the barrel band there?" there was a method to my madness. When I switched the gun to .177 while back using a 14" Crosman barrel, I added 2 more barrel set screws to the breech and free-floated the barrel. My groups tightened up a bit (plus I liked the look) so I left it. Well, when I tore it down the other night I noticed a bit of flex happening at the front of the breech. Breech screws were tight, but with very little force applied to barrel the front of breech would "separate" from the tube. Very little mind you, but movement nonetheless, so this was my quick fix. With the band tight to the breech I basically have an extra long breech with 3 attachment points - no more movement and still free floating!
Hope I didn't bore you all with the long-winded post!
Thanks for looking,
Todd |
|
|
|
|
|
|
| |  |  | | | |  |  |
| | | | | | | | | | | | | | |
| Posted: Sat Mar 23, 2013 12:11 pm |
|
|
| Sholo |
| Veteran Member |
|
|
| Joined: 24 Mar 2011 |
| Posts: 125 |
| Location: Eastern Ontario |
|
|
|
Well I managed to sneak away to the basement long enough to finish the first round of testing. Still have a bit of fiddling to do yet, but I'm getting close...at least I think I am.
With our wonderful Canadian law requiring pellet pistols to be sub-500 fps, I knew that in order to keep a light (7.56 gr) pellet under 500 fps on a 2000 psi unregulated fill would require choking the air flow off substantially, so I'm using a bone-stock Disco valve, lighter hammer (45 grams vs 60), clipped 2240 hammer spring and a TP from a Crosman Challenger which measures .050". Gun currently has a 14" barrel because that's all I have on hand at the moment in .177, but plan on eventually getting a 10.1" LW barrel.
It was a PITA to tear gun apart to get the rear cap off in order to clip hammer spring a bit at a time, so I drilled/tapped the cap 3/8-16 and made up a rudimentary RVA of sorts using a couple of 6-32 knurled nuts (the kind used to hold a lampshade on), a piece of threaded rod 3/8" long drilled/tapped 6-32, and finally a piece of 3/16 aluminum rod for the guide which was also drilled/tapped 6-32. All the pieces are threaded onto a 1-1/4" long 6-32 S/S screw (with red loctite applied) holding it all together. It ain't pretty, but does the job (stock 2240 spring above for comparison):

I'm using the RVA more as a "removable plug" to access the spring rather than a velocity adjuster. It can't be turned in any farther than the first knurled nut, so I've made it (or should say in the process of making it) so that when it is maxed out (turned all the way in) a 7.56 gr pellet is travelling at 500 fps or less (4.18 fpe). I'm still getting 25-30 shots in the middle of the string though that are 501-506 fps (one at 511) so it looks like I need to remove another half coil or so...
Using Rsterne's "within 4% of peak velocity" guideline, I'm currently getting 60 shots from a 2000 psi fill shooting all the way down 650 psi, at which point the velocity drops to below 480 fps:
Shot#
1-10: H=486.3, L=482.6, AVG=484.5
11-20: H=506.6, L=501.3, AVG=503.9
21-30: H=505.4, L=500.8, AVG=503.1
31-40: H=505.5, L=494.3, AVG=499.9
41-50: H=495.1, L=491.9, AVG=493.5
51-60: H=490.5, L=481.7, AVG=486.1
I then put up a target with 6 bull's on it (traced a dime for bull) and shot 10 shots at each bull from 10 yards to see how the POA/POI correlated with the falling pressure in tube. I now understand why Bob uses the 4% guideline - very little deviation across all 60 shots!
The following target doesn't really show the full potential of the gun as I shot from a standing position with the front of gun resting on a rolled up towel on top of a 4-1/2' step ladder - not the best configuration for accuracy testing by a long shot ... . Center two targets are a bit of a disaster...not the gun's fault though - I lost my "groove" and took too long between shots developing a case of the shakes, which the target painfully reflects (that "shiny thing" in the center is a dime):

Still have to test for "the most accurate pellet", and when I find it I'll do an accuracy test with the gun in a vice so I can see what the gun IS capable of without human error involved. Plus, I have a couple items coming that will transform it into a real tack-driver. Then the hard part will be training myself to match those results!
Started with a full 2000 psi fill and this is what the gauge read after shot 60 (about 650 psi ...)

Next step, I think I will get the JBWeld out and "fill-n-drill" an extra .109" TP I have to .040" and see what that does for shot count/velocity. If that doesn't work I'll go back to the .050" TP and just clip a half coil or so to make sure it stays under the 500 fps/4.2 fpe limit which should gain me another few shots in the process...
Cheers,
Todd |
|
|
|
|
|
|
| | | | | | | | |
| | | | | | | | | | | | | | |
| Posted: Sat Apr 13, 2013 10:11 am |
|
|
| toadmyster223 |
| Senior Member |

|
|
| Joined: 20 Mar 2012 |
| Posts: 501 |
| Location: Fayette Nam, PA |
|
|
|
| Very cool! Great work, and I love reading the 'long winded" posts |
|
|
|
|
|
|
| | | | | | | | |
| | | | | | | | | | | | | | |
| Posted: Sun Apr 28, 2013 5:30 am |
|
|
| Sholo |
| Veteran Member |
|
|
| Joined: 24 Mar 2011 |
| Posts: 125 |
| Location: Eastern Ontario |
|
|
|
I should have posted an update earlier, but work is insanely busy right now and I haven't had too much "me time" lately (I'm only home on weekends... ) , but I did manage to do a couple improvements on the gun. ) , but I did manage to do a couple improvements on the gun.
First thing I did was install a P-rod trigger group that I purchased from Eric which, IMO, should come standard on ALL 22xx/13xx guns right from the factory . What an awesome trigger! . It can be adjusted any way you want - length of 1st stage, length of 2nd stage, trigger pull weight, trigger overtravel, etc... Only modification I had to do was fill the waist of my 22xx hammer with JB Weld. Alternately, you could just purchase the P-rod hammer (no waist) and drop it in, but if you want to save a few bucks and don't mind a little extra work, the JB'd hammer works perfect too. If you decide on the JB route, a tip I found on another forum was once you have the cured JB all nice and smooth, apply a couple coats of Krazy glue/Super glue with a small paintbrush to the area where the sear will ride. This makes a hard, slick finish for the sear ride against...
Second thing I did...or should say, I had done by SeanMP...was to choke and lap my 14" Crosman barrel. I was originally just going to purchase a 10.1" LW barrel from Eric, but Sean was confident that he could make the Crosman barrel perform just as good as the LW for a fraction of the price. Sounded good to me! So I packed up my gun and spent the day at Sean's watching him work his magic.
Barrel was choked .001" (IIRC), then lead-lapped (my job) for what seemed like 500 strokes using a cleaning rod with a lead "plug" on the end that Sean made up. I could try to explain the process, but I know I'll screw it up so here is a link showing how he did an AR2078 barrel. Exact same process was done to my barrel: http://airgunhome.com/agforum/viewtopic.php?t=8028
Once everything was done and gun was re-assembled, we took turns shooting some 5 shot groups at 10m using various pellets. Two things quickly became apparent: 1) Sean is a much better shot than I am! , and 2) his choking process works awesome! , and 2) his choking process works awesome!  . I then took the gun home (and as per his instructions) I ran a cleaning patch with some bore-brite applied through the barrel a few times once I had roughly 200 shots through it. . I then took the gun home (and as per his instructions) I ran a cleaning patch with some bore-brite applied through the barrel a few times once I had roughly 200 shots through it.
Here are the results from his work...circles are dime-sized (first pic is with stock barrel, second one is after choking process):


Not sure what the flyer (shot #3, btw) was all about with the H&N Match Pistol, so I took 6 shots on that target and was relieved that the next 3 grouped pretty well! My guess with the flyer is that I inadvertently loaded a pellet with a deformed skirt...
To quote Phil Robertson (from Duck Dynasty) - I'm "Happy, Happy, Happy"!
Thanks a ton, Sean! You have no idea how much I appreciate your skills and your time on this, Bud!
Cheers,
Todd |
|
|
|
|
|
|
| | | | | | | | |
| | | | | | | | | 1750 PCP Target Pistol | | | | | |
Air Gun Home Forum Index » Pistols
You cannot post new topics in this forum
You cannot reply to topics in this forum
You cannot edit your posts in this forum
You cannot delete your posts in this forum
You cannot vote in polls in this forum
|
All times are GMT - 5 Hours
Page 1 of 1
|
|
|
|
| | | | | | | | |
Note: If you are seeing "Please enter your username and password to log in." Your browser cookies have been reset
or you need to register to access the topic in question. Use the 'Register' button near the top left of this page.
|













