 |  | | | |  | |  |  | Leaking QB78 |  | |  |  | |
 Posted: Tue Aug 21, 2007 3:48 pm Posted: Tue Aug 21, 2007 3:48 pm |
 |
|
| Alstone |
| Moderator & Site Supporter |

 |
|
| Joined: 01 Mar 2007 |
| Posts: 4139 |
| Location: Linconshire, ENGLAND |
|
|
|
Fetched my QB78 today, the guy I bought it off was going to fix a leaking gas valve but got the job around his neck, the "new" valve he had was an old broken one someone had sold him.
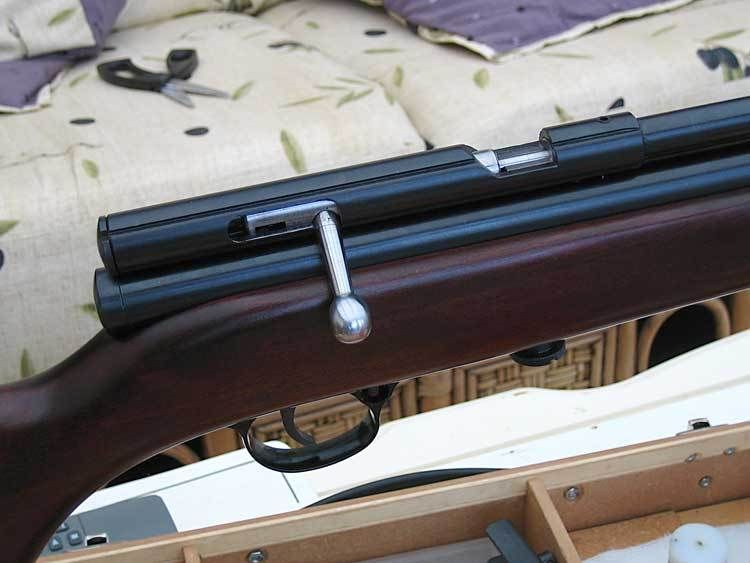
So I fetched it as it was, considering it is 18 monthe old it is in excellent condition hardly any marks on it. Seeing as I would have to strip it down to repair the valve, I decided to do a few jobs on the breech, the first thing to do was take the edge off the gas port that enters the barrel, so that it dosen't shave bits of lead off pellets when loaded, next lap the bore of the reciever and polish the bolt, also polish the breach to make the pellet slide in smoothly, the last job was to machine the knob on the end of the bolt handle "I really do not like that lemon shaped knob" it now has a nice shiny round one.

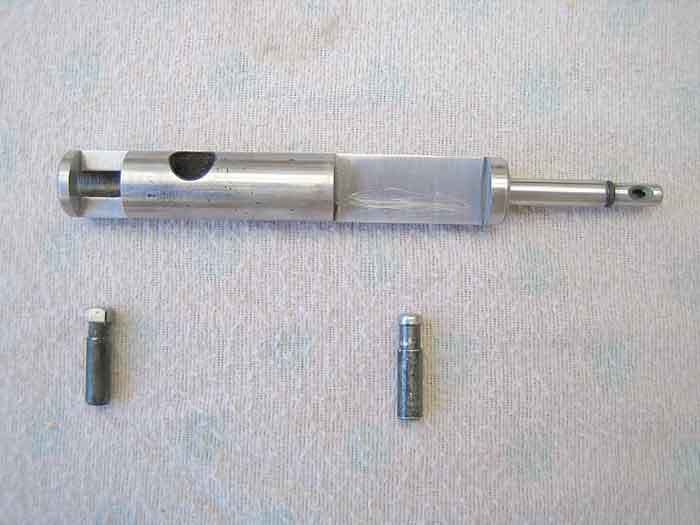
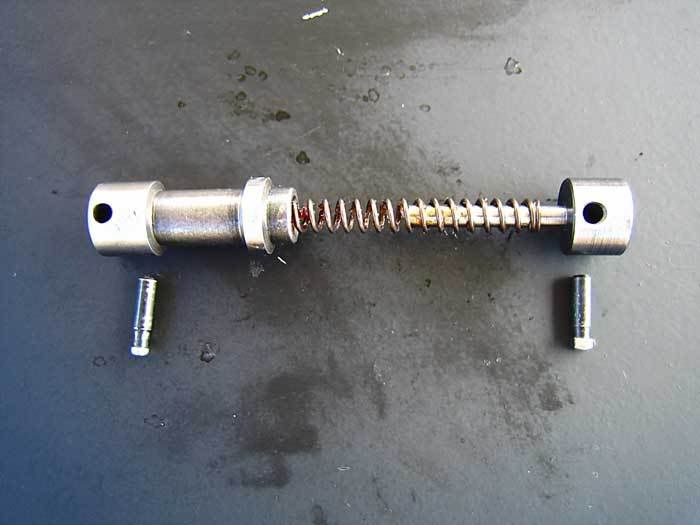
Now on to the valve, this is the valve that releases the gas when you pull the trigger, it was a bit of a pig getting it out, the front half unscrewed OK but the back piece had to be tapped out with a wooden drift, looking at the valve seal the problem was obvious a piece of brass shaving was embedded in to the seal itself and has I did not have another one things looked serious.
After a bit of thought I warmed up the valve to get the stem out of the brass seal holder, this melted the seal but it was no good anyway, the seal looked like it was made out of Urethane, luckily I had some 1/8 thick so I punched a 1/8 hole in it for the valve stem put it on to a 1/8 screw & nut so that I could spin it in the lathe and machine the outer diameter this was then fitted on to the valve stem and pushed into the brass seal holder.
Old seals
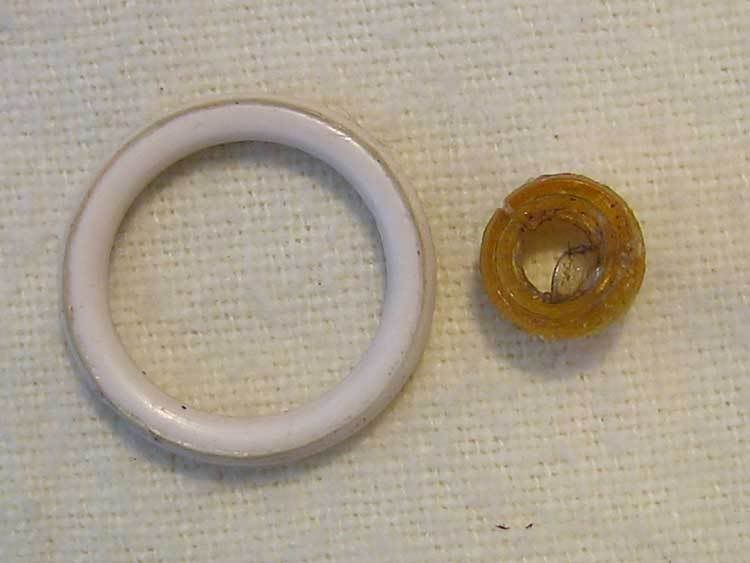
This is not my photo I forgot to take one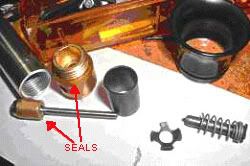
The large O ring between the two parts of the valve was a bit cut up as well so I replaced this also.
The whole lot was put back together gased up and tested, amazingly it worked full power with no leaks. So did a quick Crony test for Stevie and it came out at 660 fps and stayed around there for about 55 shots, the outside temp was 18C " British summer time" Ha Ha! So things aren't to bad.
Iv'e got plenty more things to do to it but that will do for now.
PS: Anyone Know where to buy Valve bits in the UK.
Al |
|
|
|
|
|
|
| |  |  | | | |  |  |
| | | | | | | | | | | | | | |
| Posted: Tue Aug 21, 2007 6:40 pm |
|
|
| StevieLaner7777 |
| Moderator |
 |
|
| Joined: 07 Mar 2007 |
| Posts: 1060 |
| Location: Herefordshire, UK |
|
|
|
Hi Al
So you've got your QB78 working now then Al, Sound like it took some doing to achieve it!
660FPS seems pretty good at the moment considering it hasn't been used for a long time, Though obviously a bit more use to wear in the Rifle and a bit of work on the valve etc should increase this to it's claimed velocity.
OK, so many Q's where do I start!
Have you tried polishing the stock? I highly advise you do it!
How did you take the edge off the Gas port?
Did you lacquer the Bolt handle after polishing it on the lathe?
I really envy your QB78's Bolt handle and Bolt slide Al, I was thinking of machining a new Bolt handle out of Stainless, But now after seeing the outcome of your polished Bolt handle I think I will do the same.
Lastly, No I can't think of anywhere in the UK that sells parts for the QB78's valve besides that site that you posted a link to the other day, I'm thinking Chambers might do them though! I will have a look around.
Good work! 
Stevie  |
|
_________________
"Who Dares Wins" - SAS 22nd Regiment Hereford. |
|
|
|
|
|
| | | | | | | | |
| | | | | | | | | | | | | | |
| Posted: Tue Aug 21, 2007 6:47 pm |
|
|
| AirGunEric |
| Site Admin |

 |
|
| Joined: 20 Jan 2007 |
| Posts: 6908 |
| Location: "Out There" |
|
|
|
Hmmm, shiney. 
Any idea how the brass shaving got in the seal in the first place? Someone try to mod it previously, or bad factory clean-up?
What is the "claimed" maximum velocity for the QB78's sold in the UK? 660fps seems fair enough. That valve looks pretty "heavy duty"- not one of those aluminum/plastic jobs that are common on many North American Co² guns. Any potential for modifying it (porting it a bit, for example)? |
|
|
|
|
|
|
| | | | | | | | |
| | | | | | | | | | | | | | |
| Posted: Tue Aug 21, 2007 7:01 pm |
|
|
| StevieLaner7777 |
| Moderator |
|
|
| Joined: 07 Mar 2007 |
| Posts: 1060 |
| Location: Herefordshire, UK |
|
|
|
Hi Eric
The claimed maximum velocity on the QB78/XS78's is 800FPS for .177cal and is 600FPS for .22cal on the UK versions.
No luck with finding a site in the UK that sells Valve parts for the QB/XS78's yet 
Stevie |
|
_________________
"Who Dares Wins" - SAS 22nd Regiment Hereford. |
|
|
|
|
|
| | | | | | | | |
| | | | | | | | | | | | | | |
| Posted: Tue Aug 21, 2007 7:02 pm |
|
|
| Alstone |
| Moderator & Site Supporter |
|
|
| Joined: 01 Mar 2007 |
| Posts: 4139 |
| Location: Linconshire, ENGLAND |
|
|
|
Hi stevie
According to the book I got with it the fps is supposed to be 620 with .177 and 480 with a .22, I thought I was doing well, I don't think I will alter the valve just yet 660 fps suites me at the moment, it does give me 60 shots.
As for the stock, No I haven't tried any polish yet, I'll get round to that in the next day or two.
Taking the edges off the gas port is difficult, I'll do a drawing and come back to you on that one.
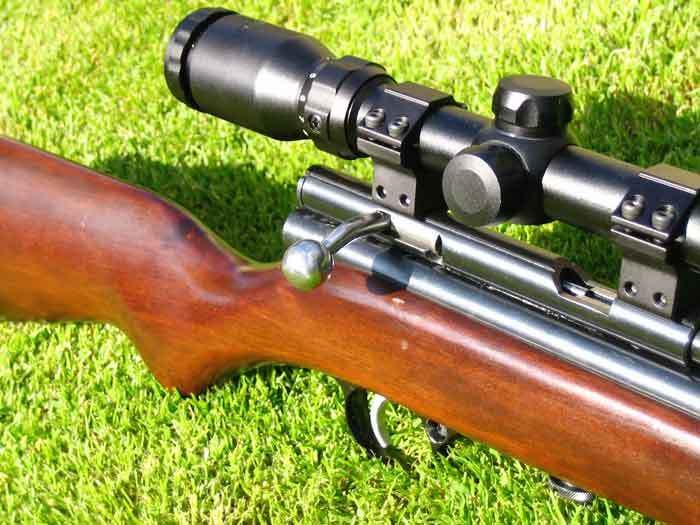
The bolt handle did come up well, I think it looks better against the black bolt tube, also you can see where to put the pellets better.
I had another look at that site and they do valve bits, O ring kits etc, so thats not a problem now.
The only thing I have to get done is a silencer, It is quiter than my other guns but still has a bit of a crack, I'll get that sorted over the next few days, I think I an going to set it up with a scope and things for now untill I can get a lump of beech for a new stock,
Did you get your's sorted out today ?
Al |
|
|
|
|
|
|
| | | | | | | | |
| | | | | | | | | | | | | | |
| Posted: Tue Aug 21, 2007 7:10 pm |
|
|
| Alstone |
| Moderator & Site Supporter |
|
|
| Joined: 01 Mar 2007 |
| Posts: 4139 |
| Location: Linconshire, ENGLAND |
|
|
|
Hi all
I think I was typing up a post when you were posting.
I reckon the brass shaving got there because of bad factory cleanup, or should I say nonexistant cleanup, there was shavings all over the place.
The valve can take quit a bit of modding and the bits are available.
AL |
|
|
|
|
|
|
| | | | | | | | |
| | | | | | | | | | | | | | |
| Posted: Tue Aug 21, 2007 7:45 pm |
|
|
| StevieLaner7777 |
| Moderator |
|
|
| Joined: 07 Mar 2007 |
| Posts: 1060 |
| Location: Herefordshire, UK |
|
|
|
Hi Al
| Alstone wrote: |
| According to the book I got with it the fps is supposed to be 620 with .177 and 480 with a .22, I thought I was doing well, I don't think I will alter the valve just yet 660 fps suites me at the moment, it does give me 60 shots. |
According to SMK's Official Website it is still "177 4.5mm: 800 fps (approx) / .22 5.5mm: 600 fps (approx)", So I whipped my Owners manul out, it stated that the .22 version can do 610FPS (Approx), Though it didn't mention the velocity of the .177 version, Maybe they improved the valve on their XS78's between now and 18 months ago!?! I dunno!
Anyways, Yes do get round to polishing it Al, Work it in real hard and the stock will shine up beautifully especially in the light, I've polished mine twice now with stunning results 
I look foward to seeing how you did the Gas port Al, Don't rush it though! Im a very patient guy, Speaking of patient, Eric! whats going on the the 1077 guides webpage???
Lastly are you planning on threading the end of the barrel to attach the Silencer??
And yes I did get mine sorted out today I'm yes to post on it though!
Stevie |
|
_________________
"Who Dares Wins" - SAS 22nd Regiment Hereford. |
|
|
|
|
|
| | | | | | | | |
| | | | | | | | | | | | | | |
| Posted: Tue Aug 21, 2007 11:38 pm |
|
|
| AirGunEric |
| Site Admin |
|
|
| Joined: 20 Jan 2007 |
| Posts: 6908 |
| Location: "Out There" |
|
|
|
One thing that needs to be remembered (by Stevie!) is that there are now 4 (four) versions of "QB-78" out there. Your brother's is not the newest, nor is Al's. They could be any of the 1st, 2nd, or 3rd. So- perhaps one of the first two versions only came at 620/480fps.
As for the 1077 disassembly guide- no, I haven't forgotten about it. I just haven't had the time to get to making a page out of it quite yet. |
|
|
|
|
|
|
| | | | | | | | |
| | | | | | | | | | | | | | |
| Posted: Wed Aug 22, 2007 2:35 pm |
|
|
| Alstone |
| Moderator & Site Supporter |
|
|
| Joined: 01 Mar 2007 |
| Posts: 4139 |
| Location: Linconshire, ENGLAND |
|
|
|
Stevie
This is how I took the edge off the gas port, there may be better ways but this is what I came up with.
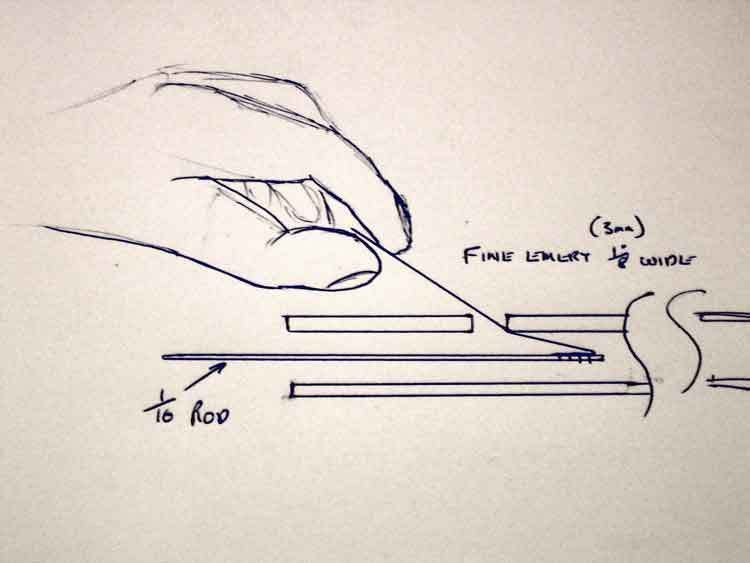
Tear a strip of fine emery 3mm wide, tape one end to a 1.5mm brass welding rod and fold back with the emery looking away from the rod, push the other end down the barrel with the emery looking away from the hole, with a piece of wire pick up the end and pull it through the hole, push the rod past the hole about 20mm, pull it back using the emery poking through the hole, keep doing this until you have. smoothed down the edge's.
For the other side just push emery down the barrel looking towards the hole and pull it back and forward the same as before.
This method does the front and back of the hole and a little on the sides but it's the front and back that make the difference.
Another way is to make a 2mm rod with a 4mm ball on the end, coat the ball in grinding paste lower it into the hole then pull it back on to the inner rim and run the drill on slow speed while rotating the ball round the hole.
This is probably better than the first.
PS: Silencer
No Stevie I'm going to make it a push on unit about 220mm long x 25mm dia with 120mm sliding over the barrel, so the gun will only be 100mm longer, it should improve the look of the rather small barrel.
And as the crack when you fire it is not to bad I think it will be adequate.
Al |
|
|
|
|
|
|
| | | | | | | | |
| | | | | | | | | | | | | | |
| Posted: Wed Aug 22, 2007 5:36 pm |
|
|
| StevieLaner7777 |
| Moderator |
|
|
| Joined: 07 Mar 2007 |
| Posts: 1060 |
| Location: Herefordshire, UK |
|
|
|
Eric
Thanks for the reminder there! I think Industry Brand have definitely made adjustments to their QB/XS78's valves since they made the first and/or second versions.
Also don't worry about finishing the 1077 Disassembly Guide's page too soon, I hadn't heard anything of it from you for a while so I was just wondering.
Al
I like the diagram! Very artistic and more importantly informative.
I think I will use the first method that you used to do it, I will do this mod before I fit the metal barrel band on to the Rifle.
Also how easy did you find it to remove the Barrel on your QB/XS78?
I've tried taking the faulty Barrel off my QB/XS78 before I took it back to be changed but It wouldn't move and more than a mm or two, I did remove the Grub screw before trying to take it out, I've also tried to remove the barrel on the one that I have got now but It's still very stubborn, Is there anything else that is holding it in? Obviously I can't take the breech off the Rifle before the Barrel has been removed so when I come to polish the Bolt slide I will be a bit stuck to say the least.
Stevie |
|
_________________
"Who Dares Wins" - SAS 22nd Regiment Hereford. |
|
|
|
|
|
| | | | | | | | |
| | | | | | | | | | | | | | |
| Posted: Wed Aug 22, 2007 6:53 pm |
|
|
| Alstone |
| Moderator & Site Supporter |
|
|
| Joined: 01 Mar 2007 |
| Posts: 4139 |
| Location: Linconshire, ENGLAND |
|
|
|
Hi Stevie
To remove the barrel on a QB you only have to remove the grub screw, mine was a bit tight but it came out with a bit of effort.
Al |
|
|
|
|
|
|
| | | | | | | | |
| | | | | | | | | | | | | | |
| Posted: Wed Aug 22, 2007 6:58 pm |
|
|
| StevieLaner7777 |
| Moderator |
|
|
| Joined: 07 Mar 2007 |
| Posts: 1060 |
| Location: Herefordshire, UK |
|
|
|
Hi Al
OK thanks! I will give it a bit more 'welly' next time then! I just wasn't 100% sure and didn't want to stress or break anything.
Cheers!
Stevie |
|
_________________
"Who Dares Wins" - SAS 22nd Regiment Hereford. |
|
|
|
|
|
| | | | | | | | |
| | | | | | | | | Leaking Again | | | | | |
| Posted: Sat Aug 25, 2007 10:41 am |
|
|
| Alstone |
| Moderator & Site Supporter |
|
|
| Joined: 01 Mar 2007 |
| Posts: 4139 |
| Location: Linconshire, ENGLAND |
|
|
|
Ah well it was to good to last, the homemade valve insert didn’t last long, so ordered a new valve piston and seal and an O ring kit from http://www.trobb.f9.co.uk/ at 3pm Friday it arrived 9.30 am Saturday, very pleased with the service, they also stock complete tuning kits.
Anyway back to the subject, fitted the new valve and everything back to normal apart from a very stiff bolt, so striped it apart again to have a look, I had polished the parts that I thought would do the job, but upon closer inspection I found some others, the pin in the top of the hammer rubs on the front of the bolt slot and also catches on the top of the slot, this also applies to the spring cocking pin, another place I had overlooked was the hole in the hammer that the spring goes in, this was as rough as a Badgers bum, and with the hammer unit being hardened I had to lap it out with emery wrapped round a steel pin which took quite some time.
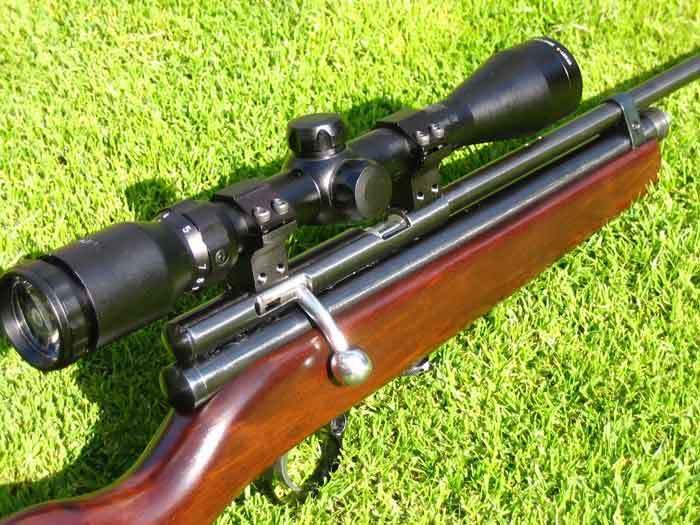
So that’s just about every thing polished and things are a lot smoother, the only thing to do now is a new bolt, the one fitted to the QB is all right but I find it a bit small, so I made a new one about ½ “ longer ( 12mm Stevie ) and fitted a larger ball, and curved it around the stock which makes it a lot more user friendly.
Al |
|
|
|
|
|
|
| | | | | | | | |
| | | | | | | | | | | | | | |
| Posted: Sat Aug 25, 2007 11:20 am |
|
|
| AirGunEric |
| Site Admin |
|
|
| Joined: 20 Jan 2007 |
| Posts: 6908 |
| Location: "Out There" |
|
|
|
| Nice job! Now how does it shoot? |
|
|
|
|
|
|
| | | | | | | | |
| | | | | | | | | | | | | | |
| Posted: Sat Aug 25, 2007 1:33 pm |
|
|
| Alstone |
| Moderator & Site Supporter |
|
|
| Joined: 01 Mar 2007 |
| Posts: 4139 |
| Location: Linconshire, ENGLAND |
|
|
|
Hi Eric
I'm not sure yet after I installed the new valve and seal I installed a couple of Co2 capsuls to try it out, and forgot the barrel band, and once it's charged you can't install it because of the screw cap that holds the capsuls in.
Anyway I stuck a new scope on and went in the garden to try it out, using a bench rest and it was shooting all over the place, I only just got the scope so I wasn't sure if it was the scope the gun or me, it wasn't untill later on that I relised that the barrel sits in the receiver supported by three O rings and a grubscrew and the scope sits on the reciver, so without a barrel band it just floats about where it likes.
After it had run out of gas I fitted the band charged it up again and gave it a quick try and things look a lot better now, I'll give it a good try tomorrow.
One thing about a QB78 I do like is that there are no capsul seals to worry about so you can leave gas in as long as you like.
Al |
|
|
|
|
|
|
| | | | | | | | |
| | | | | | | | | Leaking QB78 | | | | | |
Air Gun Home Forum Index » Rifles
You cannot post new topics in this forum
You cannot reply to topics in this forum
You cannot edit your posts in this forum
You cannot delete your posts in this forum
You cannot vote in polls in this forum
|
All times are GMT - 5 Hours
Page 1 of 2
Goto page 1, 2 Next
|
|
|
|
| | | | | | | | |
Note: If you are seeing "Please enter your username and password to log in." Your browser cookies have been reset
or you need to register to access the topic in question. Use the 'Register' button near the top left of this page.
|


